Version: Kora Courses, June 08, 2024 or later
Permissions required: Student
- Faculty members often use the same assignments across different sections of the same course, or across different semesters, and creating these from scratch every time can be time-consuming.
- Assignment Import feature allows faculty members to reuse assignments they have previously created in other courses.
- It also comes with advanced search and filtering options to locate and review assignments to be imported.
- Faculty members can import assignment(s) to a single course, while admins can batch import assignment(s) to a single or multiple courses.
To import an assignment, you can choose either of the following options:
1. Select an existing course
Select an existing course (1), go to the "Assignments"(2), click on the "+" icon (3), and select "IMPORT ASSIGNMENTS" (4).
2. Create a new course.
Create a new course and access it (1), select either the “Home” (2) or the “Assignments” (3) and then select “IMPORT ASSIGNMENTS” (4).
Import assignment(s) to a single course
To import assignment(s) to a Kora course, use the search and advanced search options to find the assignment(s).
Use search
- In the "Library", use the search bar to find specific assignments to import by Assignment Name, Assignment Type, Course Name, or Outcome Name (1).
- Enter the relevant search criteria and press Enter.
Use advanced search
- Click on the "Advanced Search" (1) and use the following fields to refine your search.
I). Assignment Name (2): Enter the name of the assignment.
II). Assignment Type (3): Specify the type of assignment.
III). Assignment created after (4): Select the date after which the assignment was created.
IV). Assignment created before (5): Select the date before which the assignment was created.
V). Due (6): Click the "Due" dropdown to reveal additional fields for due dates. If "Due on" is selected, the following fields will be shown:
-
-
-
-
- Assignment due after (7): Select the date after which the assignment is due.
- Assignment due before (8): Select the date before which the assignment is due.
-
-
-
VI). Outcome Name (9): Enter the name of the outcome.
VII). Course Name (10): Enter the name of the course.
VIII). Course sync ID (11): Enter multiple sync IDs separated by a comma.
IX). Course Type (12): Specify the type of course.
X). Course created after (13): Select the date after which the course was created.
XI). Course created before (14): Select the date before which the course was created.
XII). Course start date after (15): Select the start date after which the course begins.
XIII). Course start date before (16): Select the start date before which the course begins.
XIV). Course end date after (17): Select the end date after which the course ends.
XV). Course end date before (18): Select the end date before which the course ends.
- Click "Search" (19) to find assignments that match your specifications or "Reset" (20) to clear all search criteria and start over.
Select Assignment(s) to import
- Assignments are grouped under the existing courses (1) they belong to.
- Select one or multiple assignments by clicking the checkbox in front of the assignment name (2).
- When an assignment is selected, additional details such as course name, outcomes, grades, and assessments will be displayed (3).
- Click "Next" (4) to proceed with the import.
- The "Assignment & Activity import" dialog (5) will appear.
- Choose whether to make the assignments available to students immediately (6) or to keep them in a draft state for additional review (7).
NOTE:
If you select "Make them available to students immediately," the assignment will be available to students immediately and will be displayed under the "IN PROGRESS" section in the "Assignments" tab of the course.
If you select "Do not make them available to students yet. Additional review is required," the assignment will be under review and will be displayed under "NOT VISIBLE TO STUDENTS" with a red dot indicating this status.
- Click "Save" (8) to confirm your selection or "Cancel" (9) if you do not wish to proceed.
- The "Importing Assignments" dialog will appear (10), indicating that the system is processing the assignment import; you can close (11) this window, and the import process will continue in the background.
Review and edit imported assignment(s)
- Navigate to your course (1) for which you imported the assignment(s).
- Click on "Assignments" (2) to view all assignments for the selected course.
- Assignments not visible to students appear under "NOT VISIBLE TO STUDENTS" (3). Here a red dot indicates that the assignment is still under review and that it is not visible to students (4).
- At the top of the assignment details page, a warning message will indicate that the imported assignment needs to be reviewed before making it available to students (5).
- Click "REVIEW" (6) to begin the review process of the imported assignment.
You will now go to the assignment review and edit page. On this page, you can switch between imported assignments, search for imported assignments, import new assignments, review and edit imported assignments, and remove imported assignments.
-
Use the navigation arrows (7) or click the list icon (8) and use the search bar (9) to select assignments.
-
Review and update assignment details (10). You can change the Availablity, Grades, and Assessment options of the selected assignment. For more information on how to update assignment details, please see “Create, edit, or delete assignments”.
-
Click "ADJUST" (11) to navigate directly to the "Due date and time" section, where you can quickly set or change the due date.
- Click "SAVE" (12) to save the changes made to the current assignment, or click the dropdown arrow (13) next to "SAVE" and select "Save All" (14) to save changes made to all assignments.
- Click "CLOSE" (15) if you decide not to proceed with any changes.
- Once you complete reviewing and editing an imported assignment and save the changes, that assignment will be removed from the "NOT VISIBLE TO STUDENTS" section and added to the "IN PROGRESS" section (16).
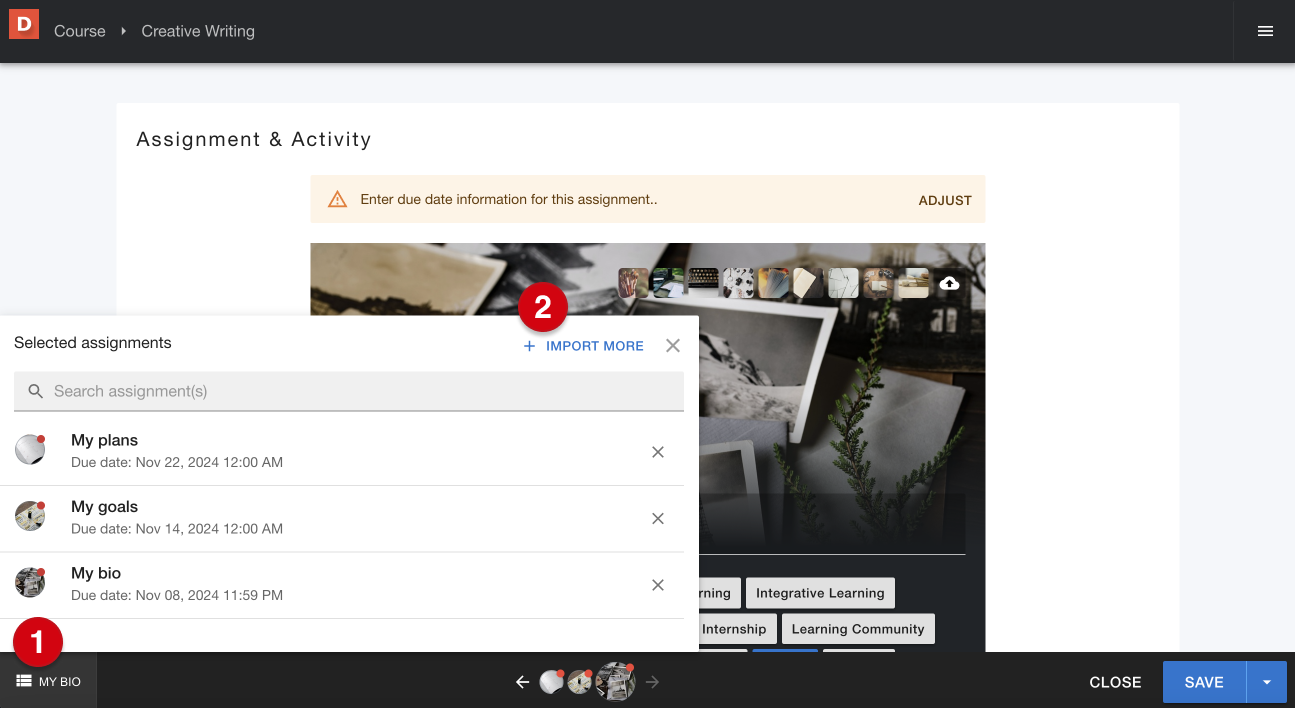
Add more assignments
- Click the list icon (1) at the bottom of the page.
- Click "+ IMPORT MORE" (2) to add additional assignments to the selected list.
- You will navigate to the assignment import page where you can follow the same steps mentioned in the “Import assignments to a single course” section.
Remove imported assignment(s)
- Click the list icon (1) at the bottom of the page.
- Click the "X" icon (2) next to an assignment to delete it from the list.
- A confirmation dialog will appear asking, "Delete this assignment?" (3) to make sure that you want to proceed with deletion.
- Click "YES, DELETE IT" (4) to permanently delete the assignment. Please be aware, that this action CANNOT be undone. Click "NO, CANCEL" (5) if you do not wish to delete the assignment.
View assignment import history
You can review the history of imported assignments, including details on who imported them and when.
- Click the menu icon (1) and click on "ASSIGNMENT IMPORT HISTORY" (2).
- The import history page displays the following information:
- Assignment Name (3): The name of the imported assignment.
- Import Date (4): The date and time when the assignment was imported.
- Import By (5): The name of the person who imported the assignment.
Batch import assignment(s) to multiple courses
Kora admins will be able to batch import assignments into multiple courses simultaneously using the Kora Course Admin Tool.
For more information on how to import assignments into multiple courses, please see “Kora Course admin tool.”