Version: Kora Courses, June 09, 2024 or later
Permissions required: Administrator
- The Kora Course admin tool allows administrators to view course and group information, manage courses, organize courses in ascending or descending order, and search, and filter courses.
- Administrators can batch import assignments into multiple courses simultaneously, saving time. This is useful when running multiple sections of the same course.
- Administrators can access any course and enroll themselves as faculty. It also provides the option to unenroll from courses.
Access Kora Course admin tool
- Click "Administration" (1) from the global navigation menu.
- Click "Kora Administration" (2) and then select "Courses" (3) to manage course settings.
View Course and Group details
You can view Kora courses and group details through the Courses page.
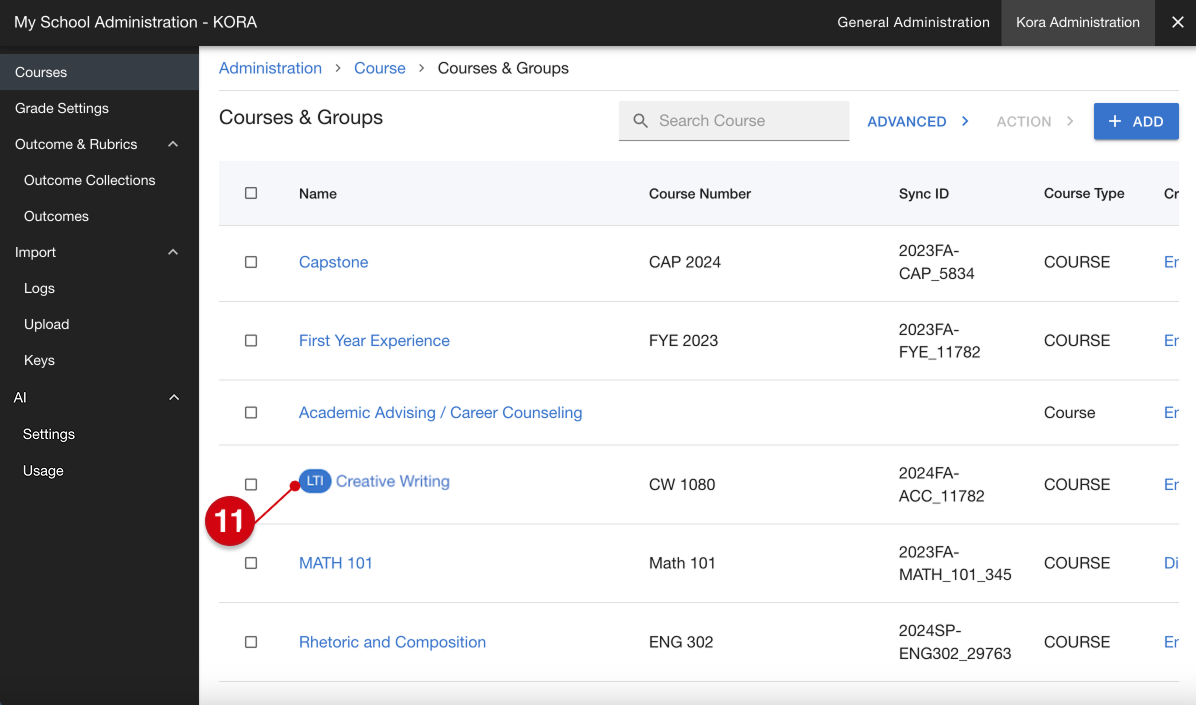
I). Name (1): Displays the course name.
II). Course Number (2): Shows a unique identifier for each course.
III). Sync ID (3): Provides a unique synchronization identifier.
IV). Course Type (4): Indicates the format, labeled here as "Course".
V). Creator (5): Lists the individual who created the course.
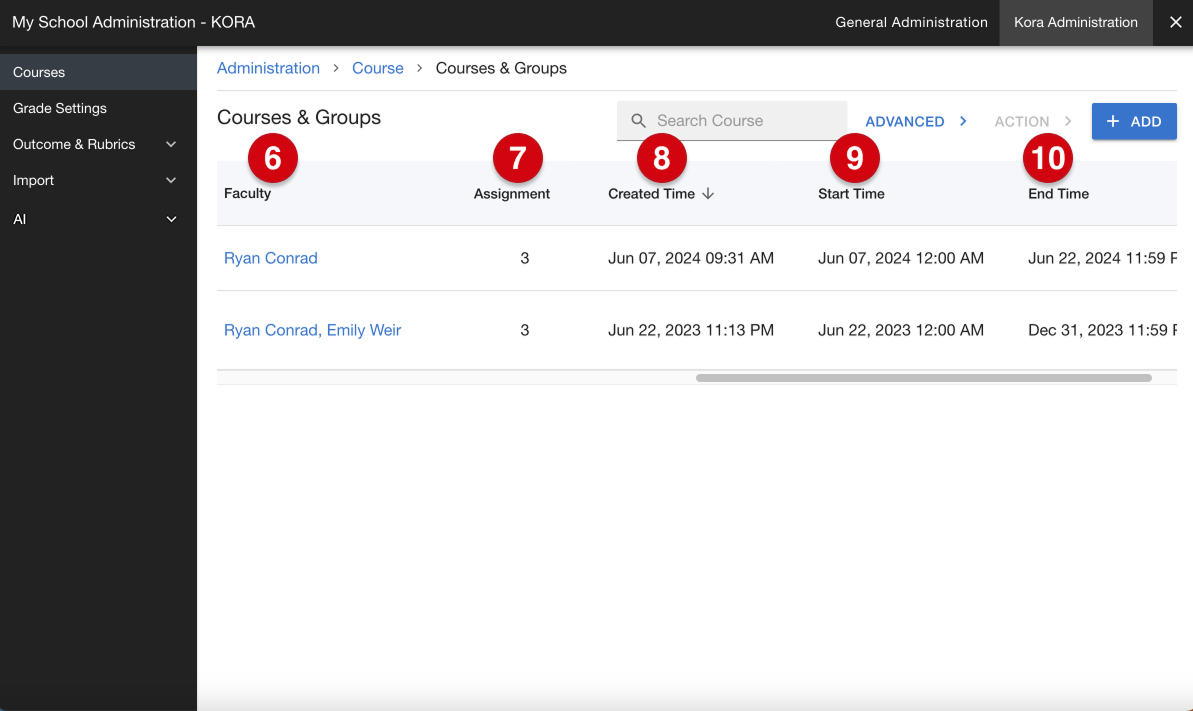
VI). Faculty (6): Displays the names of faculty members involved.
VII). Assignment (7): Shows the number of assignments linked to the course.
VIII). Created Time (8): Records when the course or assignments were created.
IX). Start Time (9) and End Time (10): Marks the active period for the course, specifying when it starts and ends.
X). LTI Indicator (11): Displays an icon to identify courses that are connected to a Learning Management System (LMS) through LTI integration.
Search for a Course
- Type the course name (1) or a relevant keyword into the search bar and hit Enter to search and locate specific courses (2).
Use advanced search
- You can use advanced search by clicking 'Advanced' (1) to find specific courses by applying the filters below.
I). Match Criteria (2): Select the type of match for the course name, number, and sync ID from the dropdown menu to specify how the search should match your input.
Exact Match: Searches for an exact match to your input.
Contains the Following: Look for courses that include your specified text anywhere in the field.
Starts with the Following: Filters courses that start with the specified text.
II). Course Name (3): Enter the name of the course you want to find.
III). Course Number (4): Input the specific course number.
IV). Course Sync ID (5): Fill in the sync ID associated with the course.
V). Course Type (6): Enter the type of course to filter by course format.
VI). Creator (7): Select a creator from the dropdown to filter courses by who created them.
VII). Faculty (8): Choose a faculty member from the dropdown to view courses they are associated with.
VIII). Created Time After (9): Set a date to filter courses created after a specific time.
IX). Created Time Before (10): Set a date to filter courses created before a specific time.
X). Start Date After (11): Filter courses that start after a specified date.
XI). Start Date Before (12): Filter courses that start before a specified date.
XII). End Date After (13): Set this to view courses that end after a particular date.
XIII). End Date Before (14): Use this to find courses that conclude before a specified date.
- Once the search criteria are set correctly, click "Search" (15)to proceed with the search, or click "Reset" (16) to refine your criteria.
Sorting options for Kora Courses
In the Kora Administration Tool, you can manage courses by sorting them based on the following options:
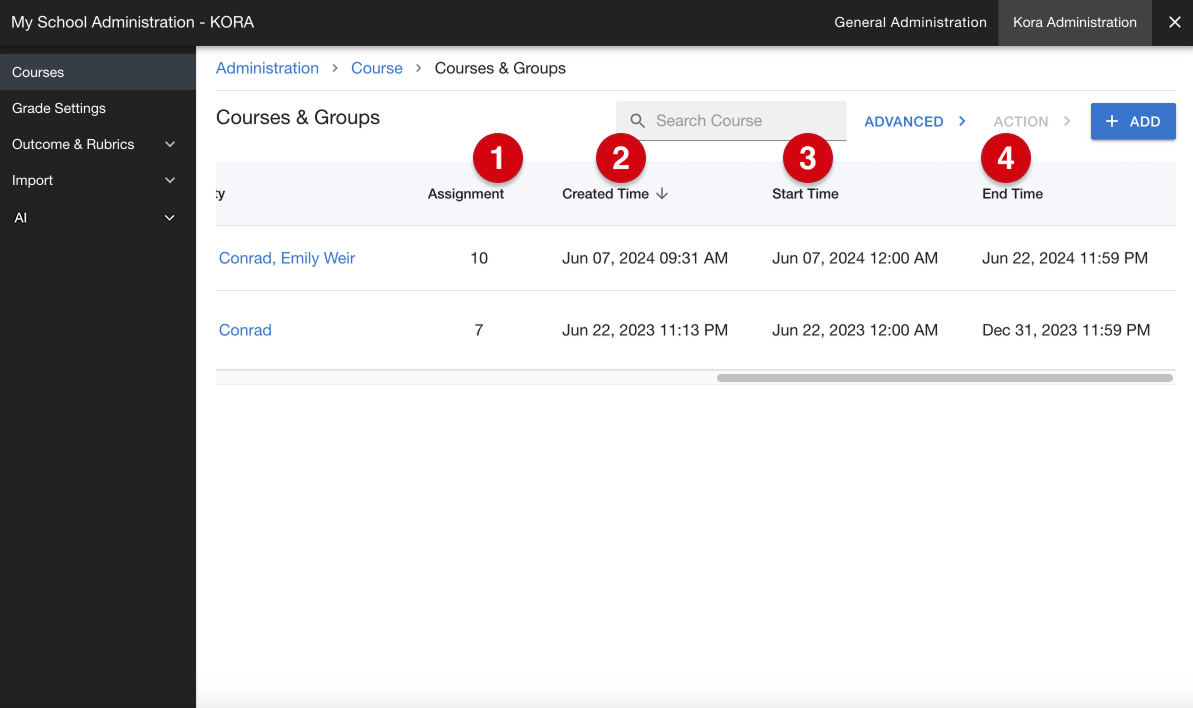
- Assignment Count (1): Prioritize courses by the number of assignments. Toggle between ascending order and descending order.
- Created Time (2): Organize courses by creation date. Sorting in ascending order shows the oldest courses first while descending order displays the most recent courses at the top.
- Start Time (3): Organize courses by start date. Ascending order sorts courses from the earliest to the latest start date, and descending order reverses this.
- End Time (4): Arrange courses by the end date. Ascending order will show courses ending soonest first, and descending order will show courses ending latest at the top.
Create new Course
- You can use the "Add" (1) option to create a new course in the Kora Administration Tool.
- Upon clicking "Add," you will be directed to the course creation page where you can enter the details for the new course. For more information on how to create a course, please see “Create, edit, or delete courses”. In addition to the steps provided in the linked article, administrators have the option to provide a Sync ID.
- The Sync ID field (2), which is only visible to administrators during course creation and editing, is an optional but essential field for integration purposes. This field must have unique value to avoid conflicts with other courses. You can also contact our support team for further assistance with adding the Sync ID field if needed.
Batch import assignment(s) to multiple courses
Kora admins will be able to batch import assignments into multiple courses simultaneously using the Kora Course Admin Tool.
- Start by clicking the checkbox (1) in front of each course you wish to select; you can choose one or multiple courses.
- Once you have selected at least one course, the "Action" button (2) will become enabled, allowing you to click on it to access import assignment options.
- Choose "Add Assignments to selected courses" (3) to batch import assignments to the selected courses.
- Upon clicking "Add Assignments," you will be directed to the assignment selection page (4) where you can import assignments.
- Here, you can filter courses by selecting either "My Courses" (5) or "All Courses" (6) from the dropdown menu.
To select and import assignments into your courses, please follow our step-by-step guide on "Import assignments."
- When you have successfully imported assignments, a confirmation alert (7) will appear stating that you have successfully imported assignments to multiple courses.
Review and edit imported assignment(s)
Administrators have the option to let faculty review imported assignments before making them available to students.
For more information on reviewing imported assignments please see “Review and edit imported assignment(s)”.
Enroll in a Course
- Select the course (1) you want to enroll in and click on its name to proceed.
- When you attempt to access a course for which you don't have permission, a warning message will appear stating, "You do not currently have permission to access the Course: Academic Advising / Career Counseling. As a system administrator, would you like to add yourself as a faculty member to this course?” (2).
- To proceed, click "Add" (3 )to gain access, or click "Cancel" (4) if you do not wish to add yourself at this time.
- When you click "Add," you will gain access to the specific course and be able to see the course details (5).
- A warning message will appear in the background, advising you that you have added yourself as a faculty member to this course (6). If you click "Close," (7) this alert will disappear.
- The course's People page (8) will now display the newly enrolled user with the role of Faculty (9).
Unenroll from a Course
- Click "Remove Me" (1) to remove the enrolled user.
- A confirmation dialog (2) will ask if you want to unenroll yourself as a faculty member from the course.
- Click "Unenroll" (3) to remove yourself from the course faculty and lose access to the course details and management options. Click "Cancel" (4) to close the confirmation dialog without making any changes.